WPF�Զ��xƯ���İ��o��ʽ(3)_.Net�̳�
���]���b�䡢�D�͡������{������������ʲô�^�e���������õă��ݣ� �b�䡢�D�͡������{���@Щ�҂������M�е��ճ�����֮ǰ������ʲô��e�� ��
�ف������@��������“fore”�� Border Ԫ�أ������F���ǰ��o��߅���������Ч�����Ҟ����O����һ�������ĺ�ɫ1����߅��ʹ���@��߅���ɫ�ʿ��Ժͱ���ɫ���������
| �������õă��ݣ� <Border.Background> <LinearGradientBrush StartPoint="0,0" EndPoint="0,1"> <GradientBrush.GradientStops> <GradientStopCollection> <GradientStop Color="#6FFF" Offset="0.5"/> <GradientStop Color="#1111" Offset="0.51"/> </GradientStopCollection> </GradientBrush.GradientStops> </LinearGradientBrush> </Border.Background> |
���ı���ͬ�Ӳ��õĝu׃�Pˢ����ʼֵ�ͽKֵֹ��λ�Î��N��һ�𣬏Ķ��γɱ��^�r���ķ���Ȍ��ȡ�
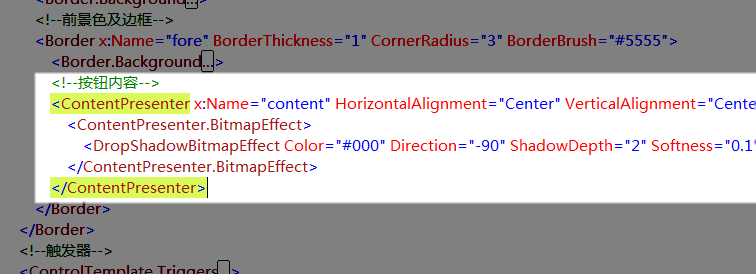
ContentPresenter Ԫ�����ڳʬF���oԭ���ă��ݣ����ڰ��o���f���ǰ��o�ϵ������ˣ���ȻҲ���ܕ����ڈDƬ�������|����
| �������õă��ݣ� <ContentPresenter.BitmapEffect> <DropShadowBitmapEffect Color="#000" Direction="-90" ShadowDepth="2" Softness="0.1" Opacity="0.3" /> </ContentPresenter.BitmapEffect> |
�Ҟ�֮����һ����̫���@���Ӱ�V�R�������@ʾЧ����

ʣ�µľ���Щ�ɐ���ԓ���� Trigger ���҂�ͨ�^�@Щ�|�l������׃���o�ڲ�ͬ��B�r�����^��
| �������õă��ݣ� <!--��������Ƴ�--> <Trigger Property="IsMouseOver" Value="True"> <Trigger.EnterActions> <BeginStoryboard> <Storyboard> <DoubleAnimation To="6" Duration="0:0:0.2" Storyboard.TargetName="back" Storyboard.TargetProperty="(Border.BitmapEffect).(OuterGlowBitmapEffect.GlowSize)" /> <ColorAnimation To="#AFFF" BeginTime="0:0:0.2" Duration="0:0:0.2" Storyboard.TargetName="fore" Storyboard.TargetProperty="(Border.Background).(LinearGradientBrush.GradientStops)[0].(GradientStop.Color)" /> <ColorAnimation To="#3FFF" BeginTime="0:0:0.2" Duration="0:0:0.2" Storyboard.TargetName="fore" Storyboard.TargetProperty="(Border.Background).(LinearGradientBrush.GradientStops)[1].(GradientStop.Color)" /> </Storyboard> </BeginStoryboard> </Trigger.EnterActions> <Trigger.ExitActions> <BeginStoryboard> <Storyboard> <DoubleAnimation Duration="0:0:0.2" Storyboard.TargetName="back" Storyboard.TargetProperty="(Border.BitmapEffect).(OuterGlowBitmapEffect.GlowSize)" /> <ColorAnimation Duration="0:0:0.2" Storyboard.TargetName="fore" Storyboard.TargetProperty="(Border.Background).(LinearGradientBrush.GradientStops)[0].(GradientStop.Color)" /> <ColorAnimation Duration="0:0:0.2" Storyboard.TargetName="fore" Storyboard.TargetProperty="(Border.Background).(LinearGradientBrush.GradientStops)[1].(GradientStop.Color)" /> </Storyboard> </BeginStoryboard> </Trigger.ExitActions> </Trigger> |
��������밴�o�r�������΄����˸�׃��l��Ч����С����׃�ϲ�����^���ɫ����׃�²�����^���ɫ�ĄӮ����@���Ҫ�c������“Storyboard.TargetProperty="(Border.Background).(LinearGradientBrush.GradientStops)[1].(GradientStop.Color)"”�����O���Z�䣬��ĥһ������ܿ����@�nj�����·����������ֻ���^�����������Ϳ��������������⡣
| �������õă��ݣ� <!--���o������--> <Trigger Property="IsPressed" Value="True"> <Trigger.EnterActions> <BeginStoryboard> <Storyboard> <DoubleAnimation To="3" Duration="0:0:0.1" Storyboard.TargetName="back" Storyboard.TargetProperty="(Border.BitmapEffect).(OuterGlowBitmapEffect.GlowSize)" /> <ColorAnimation To="#3AAA" Duration="0:0:0.1" Storyboard.TargetName="fore" Storyboard.TargetProperty="(Border.Background).(LinearGradientBrush.GradientStops)[0].(GradientStop.Color)" /> <ColorAnimation To="#2111" Duration="0:0:0.1" Storyboard.TargetName="fore" Storyboard.TargetProperty="(Border.Background).(LinearGradientBrush.GradientStops)[1].(GradientStop.Color)" /> </Storyboard> </BeginStoryboard> </Trigger.EnterActions> <Trigger.ExitActions> <BeginStoryboard> <Storyboard> <DoubleAnimation Duration="0:0:0.1" Storyboard.TargetName="back" Storyboard.TargetProperty="(Border.BitmapEffect).(OuterGlowBitmapEffect.GlowSize)" /> <ColorAnimation Duration="0:0:0.1" Storyboard.TargetName="fore" Storyboard.TargetProperty="(Border.Background).(LinearGradientBrush.GradientStops)[0].(GradientStop.Color)" /> <ColorAnimation Duration="0:0:0.1" Storyboard.TargetName="fore" Storyboard.TargetProperty="(Border.Background).(LinearGradientBrush.GradientStops)[1].(GradientStop.Color)" /> </Storyboard> </BeginStoryboard> </Trigger.ExitActions> </Trigger> |
���º͏����o�r���҂��������ƵĄӮ���׃���cǰ�����ֻ�ǔ�ֵ����ͬ��
| �������õă��ݣ� <!--���oʧЧ--> <Trigger Property="IsEnabled" Value="False"> <Setter Property="Foreground" Value="#B444"/> <Trigger.EnterActions> <BeginStoryboard> <Storyboard> <DoubleAnimation To="0" Duration="0:0:0.3" Storyboard.TargetName="back" Storyboard.TargetProperty="(Border.BitmapEffect).(OuterGlowBitmapEffect.GlowSize)" /> <DoubleAnimation To="1" Duration="0:0:0.1" Storyboard.TargetName="content" Storyboard.TargetProperty="(ContentPresenter.BitmapEffect).(DropShadowBitmapEffect.Opacity)" /> <DoubleAnimation To="-135" Duration="0:0:0.1" Storyboard.TargetName="content" Storyboard.TargetProperty="(ContentPresenter.BitmapEffect).(DropShadowBitmapEffect.Direction)" /> <ColorAnimation To="#FFF" Duration="0:0:0.3" Storyboard.TargetName="content" Storyboard.TargetProperty="(ContentPresenter.BitmapEffect).(DropShadowBitmapEffect.Color)" /> <ColorAnimation To="#D555" Duration="0:0:0.3" Storyboard.TargetName="fore" Storyboard.TargetProperty="(Border.BorderBrush).(SolidColorBrush.Color)" /> <ColorAnimation To="#CEEE" Duration="0:0:0.3" Storyboard.TargetName="fore" Storyboard.TargetProperty="(Border.Background).(LinearGradientBrush.GradientStops)[0].(GradientStop.Color)" /> <ColorAnimation To="#CDDD" Duration="0:0:0.3" Storyboard.TargetName="fore" Storyboard.TargetProperty="(Border.Background).(LinearGradientBrush.GradientStops)[1].(GradientStop.Color)" /> </Storyboard> </BeginStoryboard> </Trigger.EnterActions> <Trigger.ExitActions> <BeginStoryboard> <Storyboard> <DoubleAnimation Duration="0:0:0.1" Storyboard.TargetName="back" Storyboard.TargetProperty="(Border.BitmapEffect).(OuterGlowBitmapEffect.GlowSize)" /> <DoubleAnimation Duration="0:0:0.1" Storyboard.TargetName="content" Storyboard.TargetProperty="(ContentPresenter.BitmapEffect).(DropShadowBitmapEffect.Opacity)" /> <DoubleAnimation Duration="0:0:0.1" Storyboard.TargetName="content" Storyboard.TargetProperty="(ContentPresenter.BitmapEffect).(DropShadowBitmapEffect.Direction)" /> <ColorAnimation Duration="0:0:0.1" Storyboard.TargetName="content" Storyboard.TargetProperty="(ContentPresenter.BitmapEffect).(DropShadowBitmapEffect.Color)" /> <ColorAnimation Duration="0:0:0.1" Storyboard.TargetName="fore" Storyboard.TargetProperty="(Border.BorderBrush).(SolidColorBrush.Color)" /> <ColorAnimation Duration="0:0:0.1" Storyboard.TargetName="fore" Storyboard.TargetProperty="(Border.Background).(LinearGradientBrush.GradientStops)[0].(GradientStop.Color)" /> <ColorAnimation Duration="0:0:0.1" Storyboard.TargetName="fore" Storyboard.TargetProperty="(Border.Background).(LinearGradientBrush.GradientStops)[1].(GradientStop.Color)" /> </Storyboard> </BeginStoryboard> </Trigger.ExitActions> </Trigger> |
�����oʧЧ�r����Ҫ��׃�ܶ��|�������Ȍ������ɫ�O���ɫ��Ȼ�����΄����˸�׃��l��Ч����С����׃�����ӰЧ�������ȡ���׃�����ӰЧ���Ƕȡ���׃�����ӰЧ���ɫ����׃���o߅���ɫ����׃�ϲ�����^���ɫ����׃�²�����^���ɫ�ĄӮ���
�@���ǰ�����ݑ��õ��ӰЧ���ص�׃��ʹ֮�a�����ݵ�Ч����
���ˣ����@������n�����������c���L�ˣ�����ԓ�����ֺ��Ў��������B��Ӌ�F���ѽ������ɾ��˰ɡ�
������ʹ��Ajax��ԭ�팧������ʧ���Ľ�Q�������}�������҂��ĮaƷ��Ajax��ʹ��ܛ��UpdatePanel��,���еČ������ܳ��F�e�`����錧������ʹ����Responseֱ��ݔ�����ݣ���Ajax�Į�����ʽ���˲��ܽ������³��F�e�`�� ��Q�^�̣��ھW��
- asp.net��εõ�GRIDVIEW��ij��ij��ֵ�ķ���
- .net SMTP�l��Email����(�Ɏ�����)
- js���F�V��Ư��Ч����С����
- asp.net Repeater ���������ľ��w���F
- Asp.Net �oˢ���ļ��ς����@ʾ�M�ȗl�Č��F������˼·
- Asp.net�@ȡ�͑���IP��Ҋ���a���ڵĂ���IP���}̽ӑ
- VS2010 ˮ�������ʹ�÷���
- ASP.NET�в���SQL������(�B���ַ��������ü��@ȡ)
- asp.net����ֵ�yԇ�������a
- DataGridView - DataGridViewCheckBoxCell��ʹ�ý�B
- asp.net��javascript������(ֱ��������g������)
- ����+�惦�^�̌��F���ʾ�����a
- ���P朽ӣ�
- �̳��f����
.Net�̳�-WPF�Զ��xƯ���İ��o��ʽ(3)
 ��
��